Prior to my owning her, Adie had some homemade cabinets. I suppose they were functional and probably sufficed for the occasional weekend camping trip. (I did, in fact, take a long weekend in it’s previous configuration and it worked fine—but merely fine.) A longer trip would be problematic for a couple reasons:
- There was a gas leak in the stove.
- The water tank (which was completely boxed in and inaccessible) was disgusting.
- The cabinets were made of heavy materials (like 2x4s and particle board), rendering them not space efficient.
- The fridge was not working. Like the cabinets, it was not space efficient either.
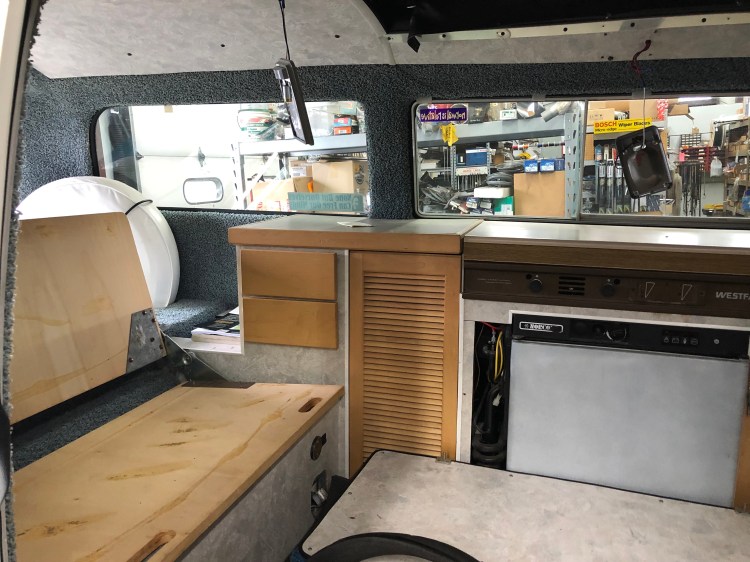
One thing the bus did have: the original cooktop. I resolved to rip out the old cabinets completely, but I would keep the cooktop.
After the demo of the old cabinets (may they rest in pieces), I installed soundproofing, insulation, wiring, and my beloved pecan floors. I began to measure things out. The old cabinets only came out as far as the cooktop—about 18 inches. The depth from the edge of the driver’s seat to the wall is 22 inches, meaning I could create more storage. The problem here is the back seat: when it folds down, it would then run into the cabinets. (And here is when I realized why the original Westys had the countertops with that groovy little curve.)
I began to piece together my cabinets in my apartment. (Everyone be kind; my ex-wife kept most of the tools, including the tablesaw.) One thing you probably know, but don’t really know about your bus until you install cabinets is just how curvy of a girl she is. Yes, the walls are bowed, but the metal has contours in it as well. Add in that the front to back has curves to it (so it has the shape of an egg), my stubbornness about using the old cooktop and you’ve got a mathematical nightmare. I made my cabinets in pieces and installed each part separately. Nothing went as planned.
This post runs into the danger of becoming a saga, so let me go back to the problems I encountered so I can give you some practical advice:
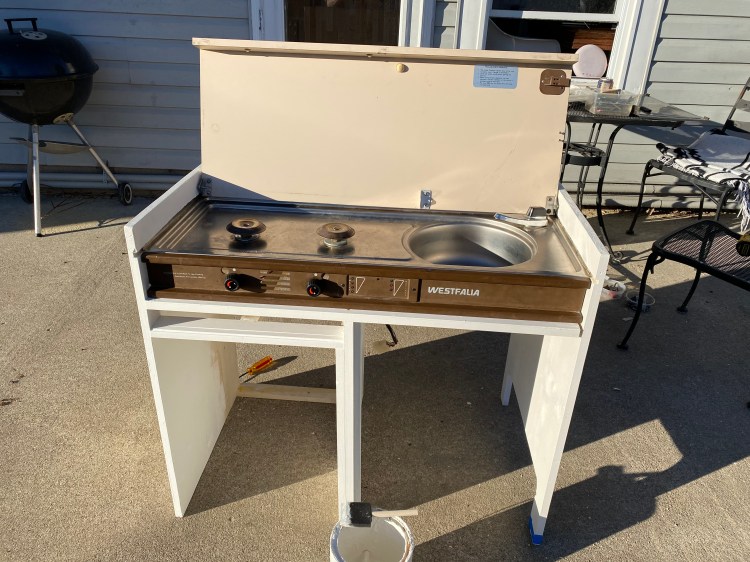
- The stove. The leak we had was not a danger in terms of catching on fire, but rather the gas asphyxiating us. I pulled all the gas lines from the stove and then did something I never thought I would do. I went to Cabela’s. My coworkers (who are probably well-meaning, but apparently don’t know me at all) bought Miracle and I a Cabela’s gift card. Perhaps they don’t understand that Cabela’s is pretty much a military cosplay / militia outfitters that sells primarily guns, gun containers, ammo, paramilitary garb, some fishing shit, and incidentals. Luckily, a cheap Coleman stove falls under incidentals. I pieced it out, fitted it to the Westy cooktop and voila—a leak-free way to heat our grub.
- The water tank. Like I said, it was completely enclosed in the recesses of the bus, caged in by 2x4s, completely unable to be removed and (this is important) sanitized. So when I pulled the tank, it got the full douche: water, bleach, water, vinegar, more bleach, soap and water, radiation, DDT, fire, and gamma rays. When I reinstalled it, I did things a little differently. First, I made the bottom of the cabinet removable so I could, you know, get to the tank. Or remove the tank. Clean it, perhaps.
Also, when you have a tank like that, the water level indicator is on the face of the stove. You’ll need to wire it up, which seems like it should be easy. And it is! …If you have the diode, which is available from Bus Depot for a cool $50. - Cabinet space. I am a freak about using every available inch. That’s why I installed a headbanger with side cubbies. It’s why I have this little storage space under the seat.
It’s why I made a similar cutout inside the cabinet on the driver side. (I mean, just think of all the cubic inches you’ve freed up!) By bumping out the cooktop, I made more storage underneath the unit, but I also created a storage space behind the sink.
The last cabinet bin is a top-loader. This is where I made the removable bottom to access my water tank. I put in a soft close hinge so our fingers and heads won’t get smashed. - The fridge. I asked around. I did my research. Bang for the buck, it seems the Dometic CRX is the best you can get. I was lucky enough to get mine on sale from a boat shop and shipped for free. It has a removable freezer unit (that actually freezes, by the way). I pretty much built my cabinets around it.

